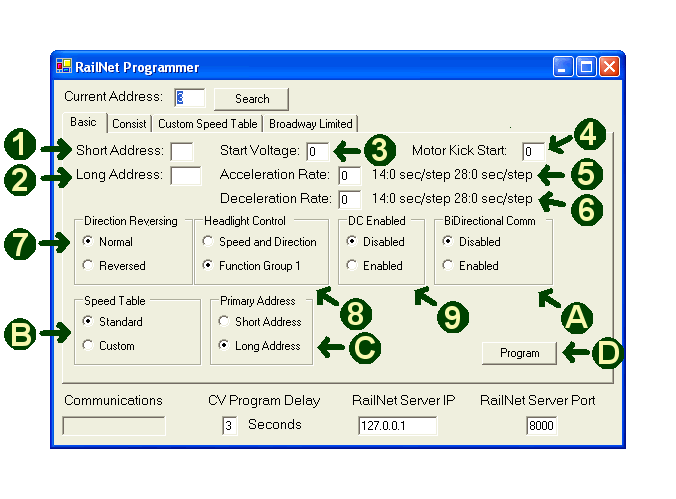
The Basic Tab

1 - Short address (CV1: 1-127)
Enter the short address to be assigned to the decoder, I typically use the last two digits of the locomotive number.
2 - Long Address (CV17&18: 128-9999)
Enter the value to be set as the long address for the decoder, I typically use the four digit locomotive number for the long sddress. If the locomotive numbe is less than four digits, I pad the number with zeros.
3 - Start Voltage (CV2: 0-255)
The start voltage setting can be used with those motors that need extra voltage to start the locomotive moving.
4 - Motor Kick Start (CV65: 0-255)
This feature is used to provide motors with an initial higher voltage to get moving, it provides a higher voltage level just until the motor starts turning and then is reduced to the proper voltage level. This can be seen in older motors when it may take a speed step of 4 to get the locomotive to move from a dead stop, but can maintain a slower speed at speed steps 3, 2, and sometimes even 1.
5 - Acceleration Rate (CV3: 0-255)
The acceleration rate (also called momentum) automatically builds a time delay from the transition from a lower speed step to a higher one for more realistic operation. The text to the right automatically calculates what that time interval is for 14 and 28 speed step operation.
6 - Deceleration Rate (CV4: 0-255)
The deceleration rate (also called momentum) automatically builds a time delay from the transition from a higher speed step to a lower one for more realistic operation. The text to the right automatically calculates what that time interval is for 14 and 28 speed step operation. I typically don't use deceleration momentum in case of a collision, I want to stop on a dime realistic or not.
7 - Direction Reversing (CV29 Bit 0)
This feature is particularly useful if the polarity of the leads to the motor is reversed. Instead of having to rewire the decoder to the motor, you can set this paremeter to reversed.
8 - Headlight Control (CV29 Bit 1)
The headlight function can be controlled either by Function 0 or automatically based upon speed and direction. Set this parameter to the desired control.
9 - DC Enabled (CV29 Bit 2)
Most decoders can be used on both DCC and DC electrical systems, this parameter can enable or disable that function.
A - BiDirectional Communication (CV29 Bit 3)
If your decoder and DCC system supports bidirectional communication, it can be enabled with this bit. RailNetDCC does not support bidirectional communication, so you will want to disable this.
B - Speed Table (CV29 Bit 4)
You can use the default linear speed table built into the decoder, or set a custom speed table (Custom Speed Table tab). Select the one you prefer.
C - Primary Address (CV29 Bit 5)
This selects the address the decoder will watch packets for, since the RailNetDCC and most decoders supports long addresses, I use the long address.
D - Program
After all selections are made, click on the Program button to start programming the decoder. This button only programs the CV's on the Basic tab.

